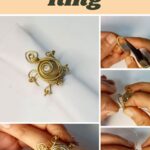

Creating a wire turtle ring is a fun and artistic jewelry-making project. This guide will take you through each step of shaping and assembling your turtle ring using simple wire-bending techniques. Here’s a quick guide on how to make it at home.

Materials and Supplies
- Jewelry wire 22 gauge (random length for the turtle body)
- 0.2mm wire (for binding)
- 8mm or 10mm bead (for the turtle shell)
- Round-nose pliers
- Wire cutters
How to Make a Wire Turtle Ring
Step-by-Step Video
STEP 1:
Take a random length of wire and bend it at the center. Use pliers to press the bent area, flattening it slightly. Then, straighten the wire back and prepare for the next step.

STEP 2:
Bend both sides of the wire inward to start forming the turtle’s body. Then, bend the wire in the opposite direction again.

STEP 3:
Use round-nose pliers to create a small loop on both sides of the wire. These loops will shape the turtle’s back two legs..

STEP 4:
After forming the first two legs, bend the remaining wire outward from both sides. Then, create two additional loops to shape the front legs of the turtle.

STEP 5:
Twist the remaining wire at the center of the turtle’s body to strengthen the structure. Then, take one wire and wrap it around the other to lock the shape in place. Turn the wrapped wire to the opposite side to prepare for adding the bead.

STEP 6:
Slide an 8mm or 10mm bead onto the wire to act as the turtle’s shell. Secure the bead by wrapping the wire around the turtle’s tail, then wrap any excess wire around the bead for a firm hold.

STEP 7:
Using the other remaining wire, form a small loop at the front to create the base of the head. Bend the wire into a triangle shape above the loop to complete the turtle’s head. Wrap the excess wire around the bead for additional support and design detail.

STEP 8:
Cut two pieces of wire, each about 2 inches long. Make loops at both ends of each wire to prepare them for attachment. Bend both wires into circular shapes to form the ring base.

STEP 9:
Carefully connect the four loops of the turtle’s legs to the four loops of the ring base, ensuring they are securely linked. Once attached, join the two wire rings together to provide extra stability and support for the structure. Adjust as needed to ensure a balanced and comfortable fit.

STEP 10:
Take a 0.2mm wire and wrap it around the two ring wires to bind them together. Make sure the wrapping is tight and evenly spaced to secure the structure. Smooth out any sharp edges for a comfortable and polished finish.

Your handmade wire turtle ring is now complete!