
Piñatas are more than just colorful party decorations—they’re symbols of celebration, community, and joy. Traditionally made from papier-mâché or cardboard and filled with treats like candy, fruit, or small toys, piñatas have long been a highlight of festive gatherings, especially in Mexican culture during birthdays, Christmas, and other special events. They’re meant to be broken open in fun, laughter-filled moments, scattering surprises and smiles in every direction.
Inspired by this tradition, I decided to try making a mini version at home—something festive, hands-on, and just the right size for a weekend craft with the kids. We wanted something cheerful to display, and piñatas felt like the perfect project. Pinatas are fun to decorate with bright layers of tissue paper, but they also provide an opportunity to get creative together.
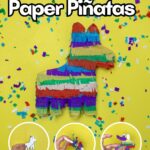
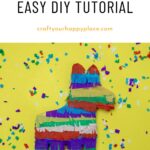
This mini donkey piñata brings all the fun of the classic version, just on a smaller, more manageable scale. Whether you’re using it as a party decoration, gift topper, or a playful table centerpiece, it’s sure to brighten up any room. Here’s a step-by-step guide to crafting a DIY mini piñata at home- and there’s a video too.

Supplies:
- Thick white cardstock (or light cardboard)
- Pencil
- Scissors
- Hot glue gun and glue sticks
- Ruler (optional)
- Colorful tissue paper (red, blue, green, yellow, purple)
Step by Step Video Tutorial Mini Pinata
Click here to subscribe to my YouTube Channel for more great videos!
Instructions:
Step 1: Draw and Cut Out the Donkey Shape
Draw a simple donkey outline on a piece of white cardstock. Fold the paper in half so that you can cut out two identical donkey shapes at once or trace the cutout over another cardstock paper. These will form the front and back of your piñata.


Step 2: Cut Out Side Strips
Using the same cardstock, cut several strips about 1 to 1.5 inches wide. These strips will form the sides of your piñata and help connect the front and back pieces.

Step 3: Assemble the Piñata Base
Apply hot glue along the edge of one donkey cutout. Carefully attach the cardstock strips upright along the edges, pressing them firmly into the glue as you go. Bend and shape the strips to follow the curves of the donkey.


Step 4: Attach the Second Donkey Cutout
Once the strips are secured to the first donkey shape, apply hot glue to the outer edge of the strips. Press the second donkey cutout on top to enclose the shape, forming a 3D donkey. Hold it in place for a few seconds until the glue sets.


Step 5: Cut the Tissue Paper Fringe
Take your colored tissue paper and cut it into strips about 1 inch wide. Then, fringe each strip by making small snips along one edge, leaving the top edge intact.

Step 6: Decorate With Fringe
Starting at the bottom of one side of the donkey (around the feet), glue the fringe strips in layers, working your way up. Alternate colors as you go for a fun, festive look. Wrap each fringe strip around to the opposite side to create a seamless design.


Step 7: Finish the Ears and Final Details
Continue adding fringe all the way up to the top of the donkey’s ears. Trim any overhanging pieces for a clean look.


Once fully covered, your mini donkey piñata is complete!