
You can never have too many baskets.
Baskets are a really useful decor piece! The big ones are perfect for displaying throw blankets, the smaller ones hold soaps, spoons, plants — you name it! The natural materials add a beautiful warmth to any space.
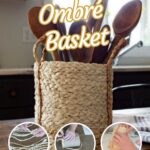
Especially beautiful? Those ombré baskets. These are exceptionally well-suited to boho decor, but really, they can work with any style.
In this post, I’ll show you how to create an ombré basket using raffia, tea, and an oatmeal container.
If you like a boho look (or coastal or basically anything raffia), don’t miss my Pottery Barn dupe of their popular seagrass charger.
Like it? Pin it!

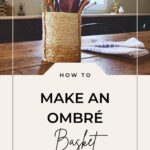
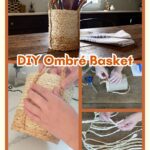
How to Make an Ombré Basket
To make an ombré basket, you simply braid raffia and dye some of it with tea, then adhere coils of it to a straight-sided container. I’m going to give you some additional tips on creating handles and creating that lovely ombré effect.
Materials and Tools
1. Braid your raffia

Separate your raffia into bundles of 3 strands each, cut to about 30″ long. Tie or tape off the top end of a set of 3 bundles, then braid each set using a standard braiding action (right side over center, left side over center, repeat) until you reach the end. Tie or tape off the tail end.
Repeat this process until you have 20 braided grass ropes. You can always make more if needed, but this is a good start.

Secret Source for Cheap Raffia
If you use a lot of raffia for crafting, I have the best tip! In the summer, stock up on raffia luau skirts from the Dollar Tree. You get a TON of tangle-free natural raffia grass for only $1!
2. Tea stain eight (8) braids of raffia

Brew a strong cup of tea using 8 oz of boiling water and four (4) tea bags. Steep the tea until cool, then remove the tea bags and submerge 4 of the eight (8) braids in the tea.
Let steep for 1 hour.
After 1 hour, add the remaining four (4) braids to the tea and allow all 8 of the raffia braids to steep for another hour.
This means your first four (4) braids had 2 hours of steep time, and the second 4 had 1 hour, resulting in two yummy shades of caramel.
Remove the braids from the tea and let them dry.
3. Cut an oatmeal container to size

If you’re using a different container, such as a plastic bag, you can skip this step. If you do use the oatmeal canister, you’ll cut the top off to make the basket the size you want.
Take one of the darkest braids and create a loop, with one end starting at the bottom of the oatmeal canister and the other end at the bottom, but 2.5″ to the left. This will create your handle.

Measure from the top of the loop down 2″ and make a pencil mark on the canister. This is where you will cut your container. Draw a pencil mark every couple of inches around the can at this same level, then connect the marks to create a guide to cut along.
Using a serrated knife, cut off the top of the canister using the guide you just drew.
4. Attach your basket handles

Remember how we used the handle loop to measure where to cut the can? Now we’re actually going to attach the handles.
Using hot glue, attach one end of a dark braid to the bottom edge of the container. Attach the other end to the bottom edge 2.5″ to the left.
Taking care to line up your second handle exactly opposite the first, attach it on the other side of the can.
5. Wrap the canister in the rest of the braids

Separate your medium and dark braids from the braids you didn’t dye. Using one of the dark braids, glue one end to the bottom edge of the container, taking care to line it down to the edge so that no cardboard shows through.
Glue the entire braid around the canister and on top of the handle.
You want this first braid to cover where you glued the ends of the handle to the canister. This creates a nice finished seam and looks far more professional.
Clip the braid end where it meets the beginning. If you align these close together, you will barely see the seam.
Start and stop all of your rows along this seam. It will be the back of the baske,t so nobody will even see any minor imperfections.

Take another dark braid, glue another row, but this time, run the braid behind the handle.
Continue gluing your braids behind the handle, using the dark braids first, then the medium braids, and finally the light braids. This color order will create that gorgeous ombré shading.

For a finished look, glue one row of braid on the inside edge of the can. This will create a more authentic rim and prevent that cardboard edge from peeking through.
6. Finish the basket handles

Finally, attach the handles to the sides of the basket with hot glue. Be sure to run a bead of glue up the entire length of the handle to ensure a secure fit with no gapping.
Your ombré basket is complete!

Be honest — you would never guess this cost less than a dollar to make. You could even experiment with adding a fabric lining to cover the cardboard completely! The finished product is surprisingly weighty, which makes it feel far more high-end than its humble beginnings.